Some say macaroon, some say macaron

Ah, macarons. The dish that makes Matt Preston say that Adriano Zumbo is the “dark horse” of patissiers every single season of Masterchef. But in all seriousness, he’s kind of right. They’re actually kind of difficult to make! I’ve made a couple of batches now – the first turned out supremo; the second sorted of ended up looking like cracked whoopie pies (though that was due to my brash confidence after my first attempt and my apparent ability to skip steps) and then finally the third worked out well again. Eh – two outta three ain’t bad!

But they’re sort of beautiful, really. It’s a beautiful texture to have this slightly crispy shell that morphs into this slightly softer, chewy interior and perhaps a little zing of a tangy filling. Incredible.

I read many, many (oh so very many) sites on macarons after my dismal second attempt and the main reasons people seem to point to are factors like overmixing, a humid environment, differing temperatures in the oven, dryness/wetness and just, plain, taking your time with things. I’m gonna make it my tip (because everyone has to have a tip on this) to get yourself a set of scales. Everyone has a different definition of “a cup” and I think it’s kind of important to get the specifics right.

So there’s basically two ways to make a macaron – the Italian way and the French way – and the main difference occurs in the egg white-whisking process. The Italian method basically involves making this sugar syrup get to a certain temperature (100 degrees?) and pouring it into your egg whites whilst whisking – they say this makes the macaron more “stable”, but also risks making it too crunchy and hollow in baking. The French method, which I have been using, is just pouring the little granules of sugar into your egg whites as you whisk – less stable, but easier to get to that “slightly crispy shell morphing into chewy interior” effect.

The recipe that follows is actually super basic. A basic almond macaron, there for the flavouring and the colouring and the filling. When I say basic, the process is not difficult. It’s not the sort of…dish (?)…that takes technical excellence. You just want to be following the steps and not taking shortcuts. Have a read around the net – EVERYONE has a different method, a different idea of what is right and wrong, a unique tip that they “swear by”. It’s kind of like stock tips: everyone claims to know what they’re talking about. Make up your own mind. If your first one screws up – hey, you wouldn’t be the first. Find a recipe you like, like I did with this, and stick to it. Hone it, flavour it, develop it.

Here we go…

You will need:
– 120gm almond meal
– 200gm powdered sugar (as in, icing sugar, not icing mixture)
– 100gm egg whites
– 30gm caster sugar
– colouring. Most people seem to recommend powdered or gel colours because (a) you need less of it to get the desired effect; and (b) it won’t upset the wet-dry ingredients balance
…and then whatever you want to fill it with. Chocolate ganache? Raspberry Jam? Passionfruit creme? It’s all gonna be good!

Step 1 – get prepared: Line a few baking trays with two layers of baking paper – maybe even draw little circles to help with sizing / placement when it comes to piping (the size of an upturned champagne glass, perhaps). Also get yourself a piping bag prepared – I actually just used one of those disposable sandwich bags and cut a little hole in one of the corners.

Step 2 – let the sieving begin: you want to be blending your almond meal and powdered sugar. In case your almond meal has a little moisture, “toast” it in the oven on about 150 degrees for up to 10 minutes then let cool (cool. not warm). I found that a good way of (a) blending; and (b) making the grains even more fine is to whack your almond meal and powdered sugar into a blender and whizz it up for a few pulses. Now it’s sieving time. Sieve your almond / powdered sugar mixture a couple of times into a bowl and don’t force the little grainy bits (you want nice, smooth biscuits here). Set aside.

Getting friendly

Step 3 – just beat it: tip your egg whites into a metal bowl – hand whisk, electric mix – however you like. Beat the whites for a while until they’re really frothy and only then start adding the sugar bit by bit. (And gel / liquid colour, if you’re using it). When the egg whites are stiff, stop. Do the old test – if you can hold the bowl upside down over your head without becoming egg white sally, then you’re good to go. Once you get to this stage, just stop. You don’t want to keep whisking and get these gross dry egg whites.

Egg whites (pinks)!

Step 4 – I’ll have the combination, thanks – quarter by quarter tip your almond mixture into the egg whites. Fold in and then add the next quarter. Your concern here is not so much about trying to keep heaps of volume in the egg whites – we’re not making a souffle. But you don’t want to overmix the thing so that it comes really runny and goopy (otherwise your macarons will spread and become really thin instead of plump and inviting). They say that your mixture should ultimately look like lava. Not having hung out in many active volcanos, I have no idea what this looks like but for me, what worked was to think of it as if you were to pick some of the mixture up in a spoon, it should slowly ooze back into the bowl, and then after maybe 20 seconds, settled back into the mixture and not stay as this obvious lump that you’ve just dropped back in. In my excitement, I actually forgot to take a picture, but it should look something like this:

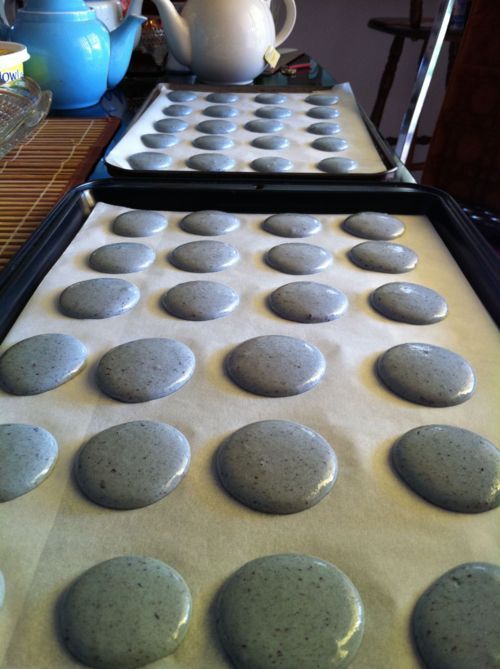
Step 5 – the pied piper: Scoop your batter into that piping / sandwich bag you had lying around. Pipe the mixture into those rounds you conveniently drew on your baking paper (or freehand if that’s your style). Once your little rounds are piped, bang the tray a few times – this evens out the surface and also brings air bubbles to the top. You need to leave this alone for, say, an hour, until the top starts to almost dry out a little – i.e. if you lightly touched the top with your finger, you wouldn’t get a big goop of macaron batter coming off. Preheat your oven to 140 degrees (fan forced) and I mean preheat. Leave it for a good 10 minutes – you don’t want to be wasting precious oven time with a mediocre heat oven.

Once again…too excited with the process – your resting macarons should look like this:

Step 6 – get baked: times vary, but for my oven, 15 minutes seemed to work pretty well, turning the tray 180 degrees half way through cooking. None of this “take it out when it’s golden” – actually do time it. A minute is the difference between a soggy and a crunchy / hollow macaron. Also only do one batch at a time – pain in the ass, yes, but ovens are often terrible in their heat distribution. Once they’re done, take the macarons out of the oven, let them cool for a little while and then peel them off the paper. If you’re having a bit of a difficult time, I find it a good idea to slide the baking sheet onto a damp cloth – only for a little while – so that a little moisture / steam loosens the biscuit. Woohoo – this time I actually DID manage to remember to take a picture.

Woohoo!

The filling can essentially be whatever you want. I went with a raspberry jam. I did this by mixing a cup of frozen raspberries along with, say, half a cup of water and a few tablespoons of sugar in a saucepan, bringing to the boil (and mashing up the raspberries as I went) and then mixing in the teensiest bit of cornflour/water to thicken it a little. It was a nice, tart touch (especially because I had topped my chocolate frosted cupcakes with these).

Anyway, the point is, take your time and be patient. This site here is epic on the topic of unbelievably in-depth experiments with macarons – check it out!

Oh, and what to do with all of those spare egg yolks? How about my deathly chocolate ice cream recipe? or maybe this freakin’ delicious lemon and lime curd?

Do you know the muffin man?

You know how you’re walking along and, all of a sudden, rays of sunlight and a holy glow bring before you a delicious, plump, fresh, perfectly iced little cupcake. It is the picture of perfection. You start drooling. You forget that lame attempt at a diet you started last week. You think to yourself….man I could really go for a bite of that. And then you do. You bite into it. And you’re like… err… that was underwhelming.

Where are the flavour in these cupcakes? I’m talking the cupcake itself, not the icing. They’re always vanilla. And while vanilla and I are sometimes friends, I just want more.

Anyhoo, without further ado, I present to you some of the most delicious cupcakes I have tasted in a while. I actually nicked it from  another website (thanks bbc!) but here it is anyway. I recently made these for a friend’s birthday, topped with a thick, sickening chocolate buttercream frosting – oh, and a macaron. (More on that one later).

Raspberry Cupcakes

You will need:
– 200gm self-raising flour
– 2 teaspoons baking powder
– 200gm unsalted butter, softened
– 4 eggs
– 200gm caster sugar
– 3 tablespoons milk
– 50gm ground almonds
– grated zest of an orange
– as many raspberries as you can cram in. Nah, but in all seriousness, say, at least a cup? You don’t want it to be the case that you end up with soggy raspberries barely held together with even soggier batter, but equally, who likes a cupcake that has one berry in it?

Step 1 – sir mixalot: whack everything but the raspberries into a bowl / mixer and beat like crazy. Make sure it’s all nice and smooth – you really can’t go wrong. Oh – and preheat your oven to 160 fan forced (or 180 otherwise)

I’m going stir crazy!

Step 2 – raspberry kiss: When it’s all smooth and cruisy, then fairly gently fold in your raspberries so they don’t break up too much (…unless you want broken up raspberries, in which case, go right ahead).

Step 3 – totally baked, man: Pour your mixture into your muffin tin of choice and whack in your preheated oven for 20-25 minutes until golden / just firm. Stick a tester in it – if it comes out with little crumb-lets on it, then your muffins are done! If it’s all sticky and gooey, leave it in for a few more minutes and try again.

Yay cupcakes

Basically, these cupcakes are great. They are super moist because of the MASSIVE amount of eggs and also the almond meal. They have a nice tang from the raspberries and the unusual hint of orange adds excitement. I was actually a huge fan of the chocolate frosting combination due to my outrageous love of chocolate orange.

Silverbean Cafe, Enmore

In an effort to calm the rage that was bubbling after having to pick up my recently purchased bike for the 4th time from repairs, and also bribe my dining friend to drive me to said bike shop, I decided that a nice, hearty brunch was in order for what was also a wild and woolly Saturday morning.

Strolling untrodden streets (well, untrodden for me, anyway), we spotted a funky looking eatery across the road – Silverbean. I’m fairly big on the old tattoo, so having a distinctly old school tattoo-ish sign on the window was definitely a drawcard. Not so much for my friend – “ew, why would you tarnish pure skin with crappy drawings?” – but that’s a story for another day and another blog.

Silverbean

Anyway. Silverbean. You know how you see someone and you automatically conjure this idea in your head of how that person would be? I do. For some reason, whenever I see people dressed in that sort of “pin up” style, with the short fringe and the tattoos on the arms, my brain bizarrely tells me that they will be mean and rude. For the waiters at Silverbean, I apologise for any misconception my brain generated. The staff were open and warm and friendly and welcoming. So much for pre-first impressions!

Silverbean boasts a sort of old school, southern American drawling slang feel. Imagine this hot Louisiana afternoon, the mozzies buzzing, the crocs snapping….Old tables with those metal foot rests, pictures of guitars, cool old-looking cabinets and a feeling that the staff are really into the whole mindset of it all.

I started off with a…wait for it…chai ($4). It was great. Not too sweet, nice and strong. I hear they brew it themselves and they should definitely be commended for it.

Chai-licious

DF had a caramel milkshake (I think it was $5) and it was mindblowing. As mindblowing as any good milkshake can be. But seriously, it was really good. Unlike the normal sickly sweet caramel, this one was a sort of butterscotch-y – I want to say “burnt” but don’t want to leave the image of bitter – it was a very well rounded, full, butterscotch-y, delicious milkshake. AND the cutest addition, a little jug of the excess milkshake on the side – perfect. As one of my first revisits to caramel after a South American-induced dulce de leche coma, it was a nice re-entry to the market.

Caramel milkshake heaven

Meal-wise, DF went for the incredibly reasonably priced “Croc Monster” ($10). A large and delicious ham and cheese toastie with an abundant supply of cheese (not necessarily a bad thing!), a fried egg and a nicely dressed side salad. DF said the ham was very flavourful and the egg was perfectly cooked.

Croc-monster

My brunch was a crunchy toastedbreakfast burrito ($12), filled with incredibly tender lamb, chunky avocado, black beans, cheese and a nice dollop of sour cream on the side. The flavours were really very nice. It seemed like a lot of care had been taken in pairing various ingredients together. The cheese was melty, the salad was crisp, the burrito was crunch and the beans had a slight kickand the tenderness of the lamb showed the length of time it had spent in the cooker.

Epic lamb breakfast burrito

Overall, it was such a pleasant experience. The staff were so friendly and efficient and welcoming. The food really tasted like care had been put into it, the prices were incredibly reasonable. When you think of food from the South, I seem to think of these heavy, carby, often fried and just BIG meals. But here, you still get that nourishing “soul” feel about it, it’s just that there’s a bit of freshness and modern-ness involved. You get these great flavours, but still feel like you can actually walk afterwards. They also had a great selection of little muffins and cupcakes and some of the specials of the day (including corn bread) made me wish I had a second (or fourth) stomach. I’ll certainly be back.

Silverbean
99 Enmore Road
Enmore  NSW 2024

Food: 8/10
Drinks: 9/10
Atmosphere: 9/10
Recommend? Absolutely, for a nourishing, warm, welcoming brunch on lazy morning

Silverbean on Urbanspoon

I scream, you scream, we all scream for ice cream

This weekend brought a bit of study and a whole lotta baking (well, I had to get my procrastination quota in!). This one is a great recipe for spare egg yolks that you might have lying around.

This one is a bit of a play on the old favourite chocolate ice cream – of course, it would work supremely well as just that. But feeling a little Mexican, I thought I’d spice it up a bit. I’d say it’s a bit moussy, a bit creamy and very, very chocolate-y. You will need:

– 500ml thickened cream
– 100gm dark chocolate
– 20gm cocoa powder
– 130gm caster sugar
– 4 egg yolks
– 1 cinnamon stick
– half a teaspoon of freshly grated nutmeg (or a bit more if you’re using pre-powdered as the fresh stuff is SUPER strong)
– 1 tsp chilli flakes (give or take, depending how you like it!)

Step 1 – just beat it: whack the egg yolks and sugar in a bowl and beat like crazy until the yolks are really creamy and pale. Bring your cream to the boil. At this point, add your cinnamon, nutmeg and chilli. Remove from heat and then pour slowly into the egg yolks, whisking constantly.

Eggs and sugar – light and creamy

Spice it up!


Step 2 – chocoholic: melt your chocolate and then stir it in to the egg yolk mixture. Add your cocoa at this point as well.

Step 3 – that’s pretty steep: return this thick, luscious molten chocolate-y mixture to your saucepan and give it some heat. Don’t let it boil, per se, just cook the mix until you can see little trails of steam coming outta the pot. At this point, remove your pot from the heat and just let it hang out – steep, if you will. Amazing flavours will come out of the cinnamon stick and the chilli will swirl through and mellow out.

Molten. Chocolate.

Step 4 – it’s a little bit chilly: have a taste – drooling yet? When the mixture has cooled, pour into your container of choice. I just went for a couple of old takeaway containers. Basically – the cool thing about this recipe is that you don’t need an ice cream maker. The only thing you need to do is take your ice cream out every hour and give it a nice little whisk around with a fork. The moisture in the cream means that little ice crystals will form as you freeze it. The point of an ice cream maker is that it is constantly churning your mixture as it freezes, so that ice crystals can’t form. By giving your ice cream a bit of a whisk around every hour, you’re just breaking up those ice crystals to make it nice and smooth.

Just eat it…

Step 5 – in a few hours, it’ll be naught but frozen. Take out and enjoy (the food coma you may get afterwards)